Table of contents
Go Migration Tutorial with migrate
Go Migration Tutorial with migrate
In frameworks like Django, migrations are created automatically , from the models. However, in languages like go, as long as we are not using an ORM, migrations will be done manually.
What is a database migration?
A migration is an abstraction to manage the state and changes that occur in a database. Instead of executing SQL statements one by one manually, we automate the process by writing all the necessary SQL and running it automatically.
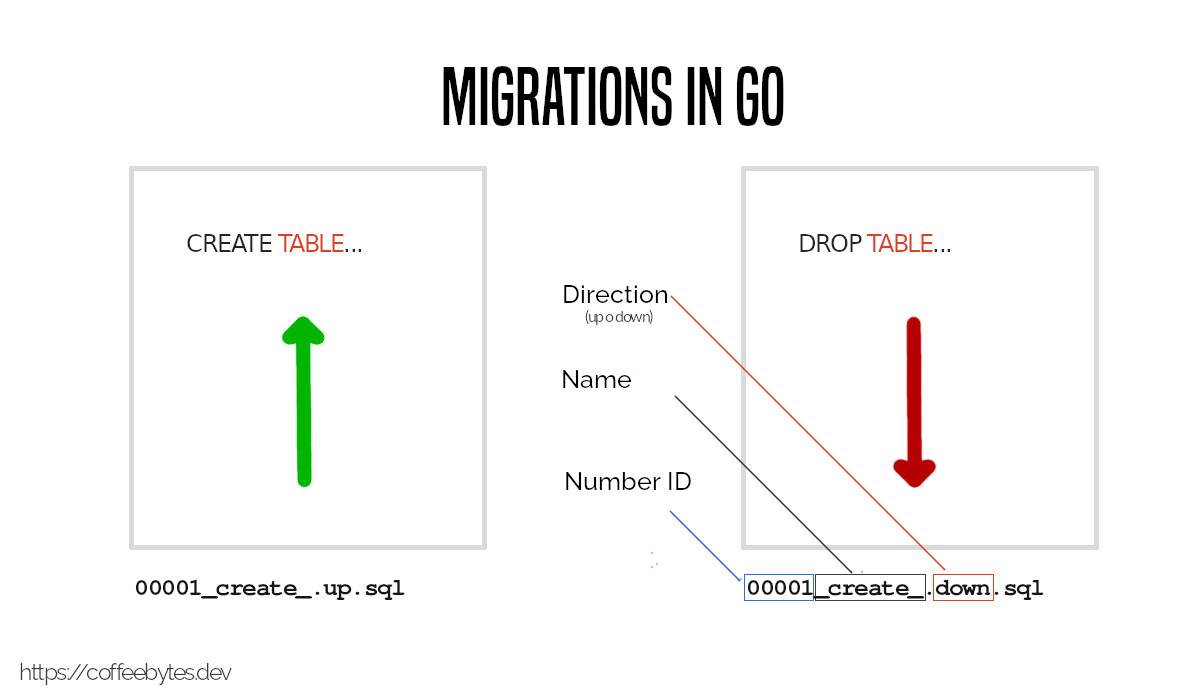
A migration consists of two files with SQL statements:
- file up: To make changes in the database.
- down file: To revert changes in the database.
For this case they are called up and down, but you could give them any other names; such as forward and backward, or next and previous.
For example:

Migrations are complementary
Notice how the migrations are reversible and complementary; one performs an action and the other reverts it.
Following this logic we can make changes to the database and then revert them.
These two files can be generated automatically (as in the case of Django, from the models) or we can write them directly in SQL, as in the case of go.
Migrate installation
To handle migrations we are going to use a tool called migrate, written in go.
Migrate can be downloaded directly from their github releases section .
curl -L https://github.com/golang-migrate/migrate/releases/download/v4.15.2/migrate.linux-amd64.tar.gz | tar xvz
mv migrate.linux-amd64 $GOPATH/bin/migrate
In new versions of Go feel free to just use:
go install -tags 'sqlite3' github.com/golang-migrate/migrate/v4/cmd/migrate@latest
You should then be able to see which version you have installed.
migrate -version
4.15.2
Migration files creation with migrate in Go
To create the pair of migration files, which I told you about earlier, we run the following command:
migrate create -seq -ext=.sql -dir=./migrations <migration_name>
I explain what each flag does:
- seq: indicates that it will be sequential, so that it begins with 000001 and continues until 00000n; the total of migrations that we have.
- dir: will indicate the directory
- ext: the extension of the file, in this case sql.
- At the end the name we want the migration to have. I will use create_first_table for this example.
After executing the command, you will have two migration files, one with extension .up.sql and the other with extension .down.sql inside the migrations folder.
ls
000001_create_first_table.up.sql 000001_create_first_table.down.sql
These files must be edited manually and the SQL statements must be placed inside them.
Example of migrations in go with postgres
For example, to create a hypothetical table users in a postgres database:
For the up:
CREATE TABLE "users" ("id" serial NOT NULL PRIMARY KEY, "name" varchar(50) NOT NULL);
And, to reverse the above, there is the down file:
DROP TABLE "users";
Again, notice how both SQL statements are complementary; one creates a table and the other deletes it. But you can put more than one statement and they can be anything you want, an index, a constraint, a routine, etc.
Execute migrations with migrate in Go
So far we have only created the migration files, but we have not let the program know where the database is.
Before making any changes to the database, we will need to indicate the access address to the database in the following format [engine]://[user]:[password]@[domain]/[database].
And, obviously, the most convenient and safest thing to do is to save this address in an environment variable .
DATABASE=[engine]://[user]:[password]@[domain]/[database]
Now we have a database to connect to.
Apply migrations
To apply all migrations we will use the up command. Migrate will automatically detect the numbering and run all migrations up in ascending order.
migrate -path=./migrations -database=$DATABASE up
Remove migrations
On the other hand, to revert all migrations we will use the down command. Migrate will automatically detect the numbering and run all migrations down in descending order.
migrate -path=./migrations -database=$DATABASE down
Go to a specific migration
Whereas, if we want to go to a specific migration, we will use the goto command followed by the migration number to which we want to take the database.
migrate -path=./migrations -database=$DATABASE goto <migration number>
Migrate will detect the active migration and run the corresponding up or down migrations to bring the database to that state.
The migration table
And how does the tool know which migration it is in? After each change we make to the database, the migrate tool will store the state of our database in a table called schema_migrations that looks like this:

Column version
Notice how the version column stores the status of the current migration. This way migrate records which version of the migrations it is in.
Dirty column
In addition, this table also contains a column called dirty that indicates if there was any conflict in the migration. In the latter case it will be necessary to repair it manually and force a new state in the table.
migrate -path=./migrations -database=$DATABASE force 1
Migrations to remote databases
The Migrate tool also supports remote migrations such as:
- Filesystem
- io/fs
- Go-Bindata
- pkger
- GitHub
- GitHub Enterprise
- Bitbucket
- Gitlab
- AWS S3
- Google Cloud Storage
Each of these endpoints requires a specific syntax. For example, the Amazon S3 endpoint looks like this:
migrate -source="s3://<bucket>/<path>" -database=$DATABASE up
With this you already know the basics about migrations and you probably also value a lot more tools and ORMs that take care of this automatically, such as Django , Ruby on Rails, South, etc.


