Table of contents
Ngrok, your localhost accessible from the internet
Ngrok, your localhost accessible from the internet
I ran into Ngrok trying to redirect a Mercado Pago payment notification to my localhost, for testing purposes. It worked more or less like this: Mercado Pago gave you a url address to redirect the buyer to make the payment. Once the payment was finished, Mercado Pago would make an HTTP request to any url address that you indicated and would send by POST the results of the payment attempt. The problem is that Mercado Pago does not send notifications to localhost.
Ngrok allows you to share your localhost externally
What Ngrok does is to serve as a tunnel that redirects any web request, through its own urls, to your localhost. This can be used to test a webhook or receive notifications, a very common task in payment gateways, share your localhost with collaborators without needing your own domain, etc.

Ngrok installation
To install Ngrok let’s go to their website and create an account or log in. You can use Github or Gmail if you don’t want to register and follow the installation instructions.
Basic use of ngrok
To run ngrok on GNU/Linux just run the executable, followed by the http option and a port number. I used 8080 but you can use the one you prefer.
./ngrok http 8080
If everything worked correctly, you will see something similar to the following.
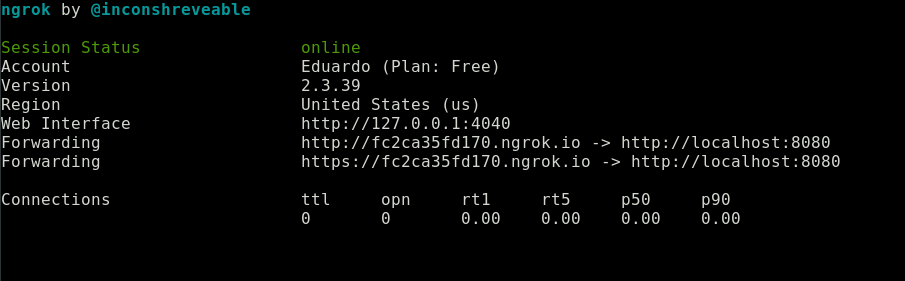
What does the above display mean? It means that all requests made to http://fc2ca35fd170.ngrok.io ; that is, to the fc2ca35fd170 subdomain of the ngrok domain, will be redirected to your localhost, specifically to port 8080. And that’s it, it’s that simple and easy to use.
Using Ngrok with Django
For this example I redirected a Django application on port 8000, instead of port 8080.
If you have no idea how to use Django I have some book recommendations: Django la guia definitiva and Django by example .
Remember to add the domain, with its subdomain to the ALLOWED_HOSTS variable in the configuration file.
# app/settings.py
ALLOWED_HOSTS = ['8da947737113.ngrok.io']
Let’s run the Django server, by default it will run on port 8000
python manage.py runserver
If we now run ngrok, specify port 8000 and access the address it indicates, we will see our application.
ngrok http 8000

Observe the domain in which our Django application is running.

Ngrok doesn’t work in Wordpress or React
If the connection hangs with Wordpress when you try to use Ngrok, add the following flag to your ngrok command. This will rewrite the host header in the HTTP request and fix your problem.
ngrok http <puerto> --host-header=rewrite
We are able to make our application accessible to anyone who has the url that ngrok provides us with!