Table of contents
How to measure requests per second with locust in python?
How to measure requests per second with locust in python?
There are quite simple to use tools that allow us to audit the number of requests per second (rps) that a website supports, locust is one of them, it is made with Python and with a minimal configuration allows us to process information and obtain graphs instantly, and in real time, of the behavior of our website.
Install locust
The first step is to install it using pip or any virtual environment manager.
pip install locust==2.2.3
Locust configuration
Once installed we are going to create a file obligatorily named locustfile.py in our application and we are going to place the following code in it.
from locust import HttpUser, task

class HelloWorldUser(HttpUser):
    @task
    def test_home(self):
        self.client.get("/")
We create a class that imports from Httpuser and assign it a method with the task decorator. Below we use the get method of client and pass it the path to which the request will be made.
Now we execute the locust command from the terminal.
locust
After executing it we will have a server running at http://localhost:8089/. If we enter we will see a screen like this:
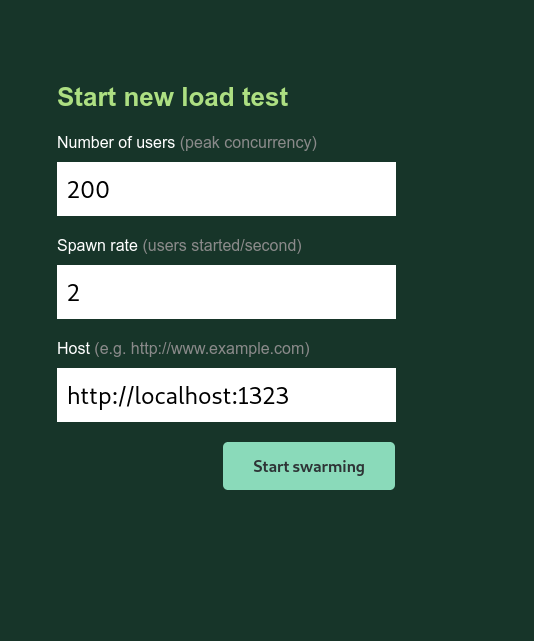
Here we place, in order:
- The number of total users,
- The speed at which locust will create users per second
- The host to test.
We fill in the data, I will use 200 users, 2 users created per second and http://localhost:1323, which directs to a local web server.
Press the “start swarming” button and locust will take care of the rest, gradually increasing the number of users.
Watch real-time monitoring. To stop it press the stop button in the upper right corner.
Metrics in locust
The statistics tab gives us the following information.

- Type of request
- Name of the route
- Number of requests
- Number of failures
- Average response time
- The response time for the 90th percentile,
- Their average, minimum and maximum values
- Response size
- Requests per second
- Current failures
Graphics in locust
When we stop the test, we will have downloadable charts in the charts tab.
The first with the number of requests per second on the Y-axis.

The second with the response time on the y-axis.

Finally, the third one, with the number of users on the Y-axis.

Add more requests per user
We can create custom behavior for our users by adding more user actions by making more get requests via the client object.
from locust import HttpUser, task

class HelloWorldUser(HttpUser):

    @task
    def test_home(self):
        self.client.get("/")
        self.client.get("/about")
This tells locust that each user will make a request to the root path and then a request to the /about path. And so we can add as many requests per user as we want.
Adding users with different behaviors in Locust
As you know, we can’t expect every user to go first to home and then to the about (or any other) section, real users don’t behave like that. Each function decorated with @task represents a different behavior, so if we add more decorated functions we will have more behaviors available.
When a user is created, Locust will assign it to the behavior of a single role decorated with @task. How does it decide which one? Randomly, with the same weight for each role; if there are two roles decorated with @task half of the users generated by locust will go to one task and the other half to the other.
from locust import HttpUser, task, between

class HelloWorldUser(HttpUser):

    @task
    def test_home(self):
        self.client.get("/")
        self.client,get("/about")

    @task
    def test_about(self):
        self.client.get("/feed")
When a fake user is created it will have a 50% chance of being assigned to one of these two behaviors:
- Visit home (/) and then visit the about section.
- Visit the feed section
Assigning different weights
But what if we know that three times as much of our traffic goes to feed instead of home?
If we pass a number as an argument to the @task decorator, it will use it as a weighting to load traffic in proportion to the value we specify.
from locust import HttpUser, task, between

class HelloWorldUser(HttpUser):

    @task
    def test_home(self):
        self.client.get("/")
        self.client,get("/about")

    @task(3)
    def test_about(self):
        self.client.get("/feed")
Now the users created will also be redirected to /feed, and not only that, but each user generated is three times more likely to go to /feed, so that route will receive more traffic.
POST requests in locust
What about POST requests? Well, locust also allows you to make POST requests, just use the client post method instead of get
from locust import HttpUser, task, between

class HelloWorldUser(HttpUser):

    wait_time = between(1, 5)

    @task
    def test_home(self):
        self.client.get("/")

    @task(3)
    def test_about(self):
        self.client.get("/feed")

    @task(2)
    def test_login(self):
        self.client.post("/login", {"username":"testuser", "password":"secret"})
But what if the request fails, what if we want to evaluate the effect that a certain POST request has on a route? For that we can use the response object.
The response object in Locust
Each request we make will return a response object, which contains information about the result of our request.
We can wrap our request in a Python with block and assign it to a response object. This object will have multiple properties, just to name a few:
- cookies
- apparent_encoding
- status_code
- success
- text
- url
- content
- connection
- elapsed
- history
- request
- request_meta
Analysing errors
Knowing the above we can obtain the different data related to the request and customize our monitoring flow. Observe:
from locust import HttpUser, task, between

class HelloWorldUser(HttpUser):

    wait_time = between(1, 5)
    # ...

    @task
    def non_existing_url(self):
        with self.client.get("/non-existing-url", catch_response=True) as response:
            if response.text != "Success":
                response.failure("Wrong request, this shouldn't exist")
            elif response.status_code < 400:
                response.failure("This url's response should be less than 400 because it doesn't exists")
            elif response.elapsed.total_seconds() > 0.5:
                response.failure("Slow response")
In the previous example, when trying to access a path that does not exist, the first conditional will be executed and will create a failure with the text “Wrong answer”, which we will be able to see in the failure section of the interface.

In addition to testing the text in the response it is possible to test the other properties of the response object, such as the response code or the time it takes to return a response.
Success management
We can also call the success method of the response object to indicate a successful response according to any behavior we want.
from locust import HttpUser, task, between

class HelloWorldUser(HttpUser):

    wait_time = between(1, 5)
    # ...

    @task
    def non_existing_url(self):
        with self.client.get("/non-existing-url", catch_response=True) as response:
            if response.status_code == 404:
                response.success()
Group multiple urls in one category
Locust shows us the results per route, but what if we want multiple routes to be evaluated in batch, as if they were the same? Either because those routes are handled by the same server or come from the same function or any other reason.
@task
def test_no_posts(self):
    for post in ["post-1", "post-2", "post-3"]:
        self.client.get("/post/{}".format(post), name="/post/[slug]")
This function will traverse the array and make a request to each item in the list and group them all under the name /post/[slug].
Emulate the behavior of users with between
As you know, user traffic is not regular, sometimes there are many requests and sometimes few. A system has to be able to handle both cases.
To simulate user behavior we can set a random timeout for each request by assigning the wait_time property and using between each user will wait from 1 to 5 seconds before their next request.
from locust import HttpUser, task, between

class HelloWorldUser(HttpUser):

    wait_time = between(1, 5)

    @task
    def hello_world(self):
        self.client.get("/")
Customized user behavior curves
Sometimes we need more realistic curves, so we need to customize the number of active users and the speed at which they are generated, in order to modify it according to what we would expect in a real situation for our website.
Locust will detect any class that inherits from LoadTestShape in locusfile.py automatically and will use its tick method to return a tuple with the number of users and their generation rate, or None to stop the test. The run_time method, which returns the time that has elapsed, will be available for us to use as we wish.
tick will be called every second to get the users, so you can play with the time to generate the number of users and the speed of generation to create the user curve you want.
from locust import HttpUser, task, between, LoadTestShape
import random

class RandomUsers(LoadTestShape):
    time_limit = 20 # Tiempo de duración de la prueba
    spawn_rate = 20

    def tick(self):
        run_time = self.get_run_time()

        if run_time < self.time_limit:
            users = random.randint(5,50)
            spawn = random.randint(5,50)
            return (users, spawns)

        return None
I have let the return data be generated randomly, but you can use a more complex behavior.
Export locust data to csv
In the web interface we can export our results in the “Download data” tab but we can also generate them in the project folder directly from the command line.
We select the headless option so that it does not load the web interface, csv will be the prefix of the csv files and host for the address of the server to test.
locust --csv=prefijo_archivos_csv --headless --host=http://127.0.0.1:1323
ls
locustfile.py Pipfile Pipfile.lock prefijo_archivos_csv_exceptions.csv prefijo_archivos_csv_failures.csv prefijo_archivos_csv_stats.csv prefijo_archivos_csv_stats_history.csv
Deepen Locust
In addition to what I have told you here, locust has hooks for events, as well as a faster client for your requests, visit the Locust documentation for more information.
Related posts
-

-

-

-

-

-